Wednesday, 22 May 2013
Final Result.
After I had finished the trailer and had organized everything for hand in, I went over everything and decided to make sure nothing had silly mistakes like spelling errors, punctuation mistakes etc as well as as looking over the final trailer to look at the mistakes, and see if there was anything I could fix before I had to hand in, there was some masking that I had to fix in the trailer for the eye although when looking at it I'm not too sure if it would make much of a difference although my biggest concern was the last scene as the masking took away the effect of the camera panning to the character. In short I think the overall piece went well I would have also hoped to do a lot better with my model sheet, I intended to give it a lot more of a professional look and then have it printed, however due to time contraints It wasn't possible. I did learn a lot from the whole process and has got me motivated to do more once my time at university is over, which is the main achievement I am proud of however I am still proud of the fact I was able to get the trailer completed and I was able to stick to the original Idea even though I resorted to my contingency plan, and I had made a few adjustments to my original Idea. I have seen my mistakes and I have seen the things I think I did well which is what matters, even though I wish I did have more time to correct the mistake, I really did genuinely have fun with this project!!! :D

Outro
The Outro was an interesting process because I started in photoshop with a basic grunge texture and then eventually transferred it to After Effects.

I added this grunge texture into photoshop and applied my text over it I didn't want two slides so I just added all my information into one picture.

I added vignette in after effects to give it more of a darker effect. I turned the layer into a 3D layer so I could mess with it a bit more as well as add CC glass with edited attributes to give it a more bumped look. I added a light source and animated it to give it some more effect. I think the over all look matched the whole project and it was exactly what I was looking for!
Tuesday, 21 May 2013
Restart
during the process my file went corrupt which was a huge blow as it meant I had to start the editing process all over again. it was time constraining however it didn't seem to cause too much trouble as I had all ready been through the process of putting everything together my main concern was would my laptop be able to keep up with pace I would work at as my laptop is on the verge of breaking down. I somewhat enjoyed the process of doing it again because I found it much easier however it did annoy me that I the file went corrupt!


Fading

Effects on the War Clip!

For The effects on the war clip I decided to give it an old school effect I first decided to add a mask to shave of the corners, I then added a very light orange tint to give it an old film effect, I added a black solid on top of this layer and added a noise effect and then played with the settings to get the scratch marls to give that projected look. I think Overall I did a good job wit the effects I feather'd the mask so it wouldn't be so sharp around the character, it was an easy process as there wasn't too much I had to do to get the effect.
Masking
I had to mask certain areas of the second and the last scene, there were areas that were cut out in the render, but I didn't think it was a good Idea so I thought it was better to mask it out.


 This last mask was so I could include the war clip into the scene, i didn't want it to cover the character as it was the focal point of the scene. throughout out the whole process I found it quite time consuming but I think it was a process that I had to go through. I think I achieved the look I was going for!

This is the second scene that I had to mask I decided to duplicate the scene (ctrl + D) as I tried to mask it seemed it was working so I tried a different method I thought I would try to expand the scene until you couldn't see the areas with the errors.

With this scene I Used shapes and key frames to cover up the areas that were cut out from the render it was a time consuming process, it included lots of Keyframes!!!

Effects on the Voice Overs
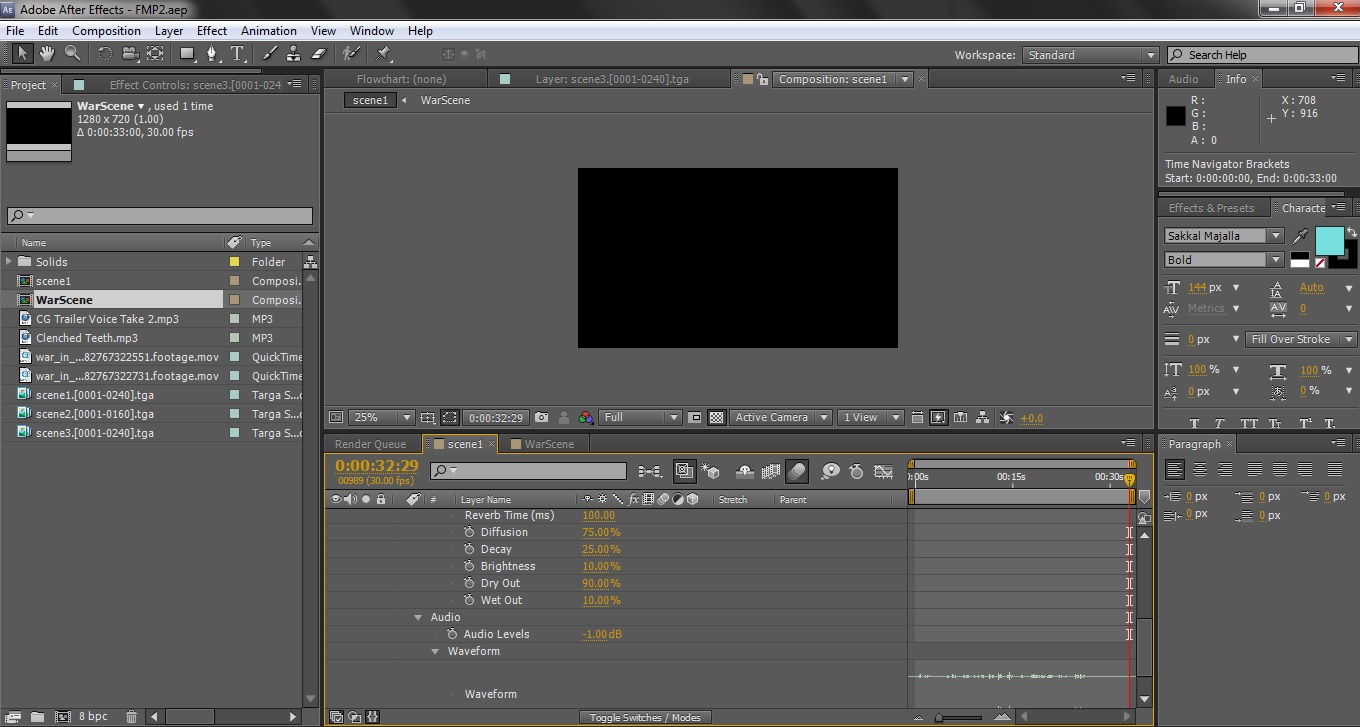
As I was going over and over the I felt that the voice didn't have enough emphasis, I wanted to give it an echoing effect. I decided to add a Reverb I altered the settings a little to get a better effect it. I think the effect worked well alongside the visuals I dropped the deci bells to make it slightly quieter but still loud enough to hear over the backing track. I feel it gives the right emphasis, and something I would hear in a cinematic trailer. the fusion between the visuals and the audio really works.
Background Music
So once I had all the clips together I was looking at how everything pieced together I felt that the trailer was still missing something so I thought to add some backing music. I found a website (http://incompetech.com/) which allows you to download free music/instrumentals. I tried various background music out, I ended up using a track called clenched teeth. I Turned the volume down so I could still here the voice over, Which I wanted to be the one thing I made sure everyone could he as it would then be pointless to have the trailer. I think the background music worked well it really gave it that dramatic and urgent feel that you would get in a trailer for a war film.


War Clips
so after I had set up the composition, I wanted to look for some clips or war in action I found three stock clips that I found through google I thought I would use these clips all together, however I found that there wouldn't be enough space to accomodate for all three clips as it would run over the 30 second time limit I had set on my self. So I decided to just include the video on the far right with the gun fire, I wanted to create some emotional impact by including this clip, I Think I achieved the effect I was looking for.


Re Rendering.
after I had rendered out all my scenes, I started noticing various mistakes once I had imported into After Effects for editing.


As you can see in the render above, you can see the point of the light source, which didn't really give my trailer the professional standard I was aiming for. this took up more time which I really wanted to avoid, however I managed to get it out of the way in time for me to get my other things done.
Rendering
I felt it was time to render out each camera, camera 1 and 3 I set at 240 frames and camera 2 at 160 frames, the resolution was 1080x720, the rendering was quite time consuming even though I was using maya software. the process of rendering was something I had been through before,I was impressed with the result as I have always rendered with mental ray I wasn't too sure about the out come.

Lighting Fixes
So after I had shown florian the lighting of my main hall he suggested that I make things a lot brighter as it would make things difficult to see, and the all the things I had built would be for nothing.

As you can the first image is quite difficult to see, although it did seem like the effect I wanted at first however it was difficult to see any of the objects I was trying to illuminate.


I wanted to adjust my lighting once I had added in the props just so I got the right effect I was looking for from the environment.


As you can the first image is quite difficult to see, although it did seem like the effect I wanted at first however it was difficult to see any of the objects I was trying to illuminate.

here I played around with the settings to achieve a better result I decided that I wanted it slightly brighter. however when speaking with my supervideo he suggested to make it brighter to guarantee that the audience can see everything.

I wanted to adjust my lighting once I had added in the props just so I got the right effect I was looking for from the environment.

This is my final result of the environment's lighting, it's exactly what I was looking for it wasn't too bright that it would take away the effect I was going for and it wasn't to dark that you couldn't see anything, I created a flat sphere in the drain and added a surface material to it and gave the material a glow effect to turn it into a light source. I found things in this stage of the project experimental as It was mainly adjusting values and adding and removing lights get a certain effect, I think it went well I think it could of been a lot better if it was mental ray there would have been more realism involved.
Monday, 20 May 2013
Cameras

once I had finished all the textures I decided to add in cameras to start getting an idea of what the final outcome would be I was playing around with the camera and see how everything would turn out. I wanted this camera to capture the light source from the middle drain. I had the camera move from one side to the other, I liked the out come so I decided to keep it.

For this camera My main idea was to focus on the poster, so I wanted to do a simple zoom in. It was a bit too fast at first so I decided to increase the frame rate to slow it down which gave me the exact look I wanted which gave that scene a lot of emphasis.

This last scene was very important because I had to get the main character have a certain look. I wanted to make the face was shadowed in certain areas and the background pitch black so I wouldn't have any problems when it came to adding extra footage.
I had relatively easy process when animating the cameras. I got the look I was looking for and didn't have many problems with animating the characters.
Synopsis
I completed what was my synopsis, it was a basically a brief overview of the story wanted to create, I did include important events that happened through out the even. I split the game up into two parts which would mean there would be two games. I wanted the story to be about the things that happen, that the public don't see, everything is Fiction and original. I was excited about this project because it was something that was mine. the ending didn't have scene that would break out in war because the main factor I was trying to portray was the fact that not everything is revealed to the public.
I learnt a lot from this process, as I use to write stories before this. I understand that I need to get some more practice in on writing stories, in terms of structure as I did feel that my story was a bit over the place and I needed to learn to structure it a lot better.
I learnt a lot from this process, as I use to write stories before this. I understand that I need to get some more practice in on writing stories, in terms of structure as I did feel that my story was a bit over the place and I needed to learn to structure it a lot better.
Sunday, 19 May 2013
POSTER
So after I had decided to create some props, I decided it still looked a bit too boring, so I decided to create a poster that would be relevant to the storyline so I decided to create an army recruitment poster.


This is the final Uv I created for the poster I wanted to give it that aged look I imported the image into photoshop and stuck the metal scratches image below, on top of the original image and set the blend to overlay which gave me the result you above. as the poster was just a plane mesh it was easy to uv map it so I didn't have much difficulty with this particular prop.

Pipe 2 texturing.
I decided to make another texture for the drain pipes as the ones I added were getting to boring and it seemed fake. I decided to follow the same structure from the previous drain pipe. I decided to try to add another Normal map via Ndo2 hoever I didn't like the outcome so I decided to stick with the just the texture I applied to the UV map.


Drain Texturing
I tried to UV texture the main drain pipes in the scene.


Construction Cone Prop


Barrel Prop


Model Sheet Digitally Painted

Subscribe to:
Posts (Atom)